Recipe

Spicy Soba Noodles

This recipe is so quick and simple that it’s a go to option when we feel like having something yum for dinner - but don’t have the energy to cook something complicated. Also, despite me making this over a dozen times, it’s only just dawned on me that this is unintentionally a Vegan dish.


INGREDIENTS:

  • 270g dried soba noodles (1 packet is 270g).

  • 4 tablespoons soy sauce

  • 2 tsp chilli bean sauce

  • 2 tsp minced fresh garlic (5-6 cloves)

  • 1 tsp sesame oil

  • 6 cups watercress (1-2 bunches), cut into 3-4 cm long pieces

  • 2 tbsp peanut/rice oil

  • Toasted Sesame seeds (garnish)

  • Optional, 1-2 Bullet chilli, chopped (to taste)


METHOD:

  1. Bring a large pot of water to boil over high heat. Add soba noodles (270g) and cook for 3-4 minutes (or whatever the package instructions are for stir fry).

  2. Whilst that is boiling, in a small bowl stir together the soy sauce (4 tbsp), chilli bean sauce (2 tsp), garlic mince and sesame oil (1 tsp). You can optionally add in 1 bullet chilli here, what I tend to do is cut it up, and add half a chilli to start with, and add to taste / heat tolerance of people eating it.

  3. Drain the boiled noodles in a colander and set aside to be used in a moment.

  4. In a large pot/hotpot, heat the peanut/rice oil over a medium-high heat for a minute.

  5. Add Watercress (be careful, the water from washing the watercress might cause it to spit), heat/cook for 1 -2 minutes until wilted (note: I cook these using kitchen tongs).

  6. Add soba noodles and sauce, and combine over medium heat.

  7. Season to taste with additional soy (be careful with how much you add, I recommend doing it in 1 tbsp amounts, mixing, and taste).

  8. Turn off heat, and serve with a garnish of toasted sesame seeds.


COOKING PHOTOS:

Sauce prep

Wash and cut Watercress into 3-4cm lengths

Cook Watercress until it wilts/reduces down

Add in cooked Soba Noodles and the sauce

Mix it all up!

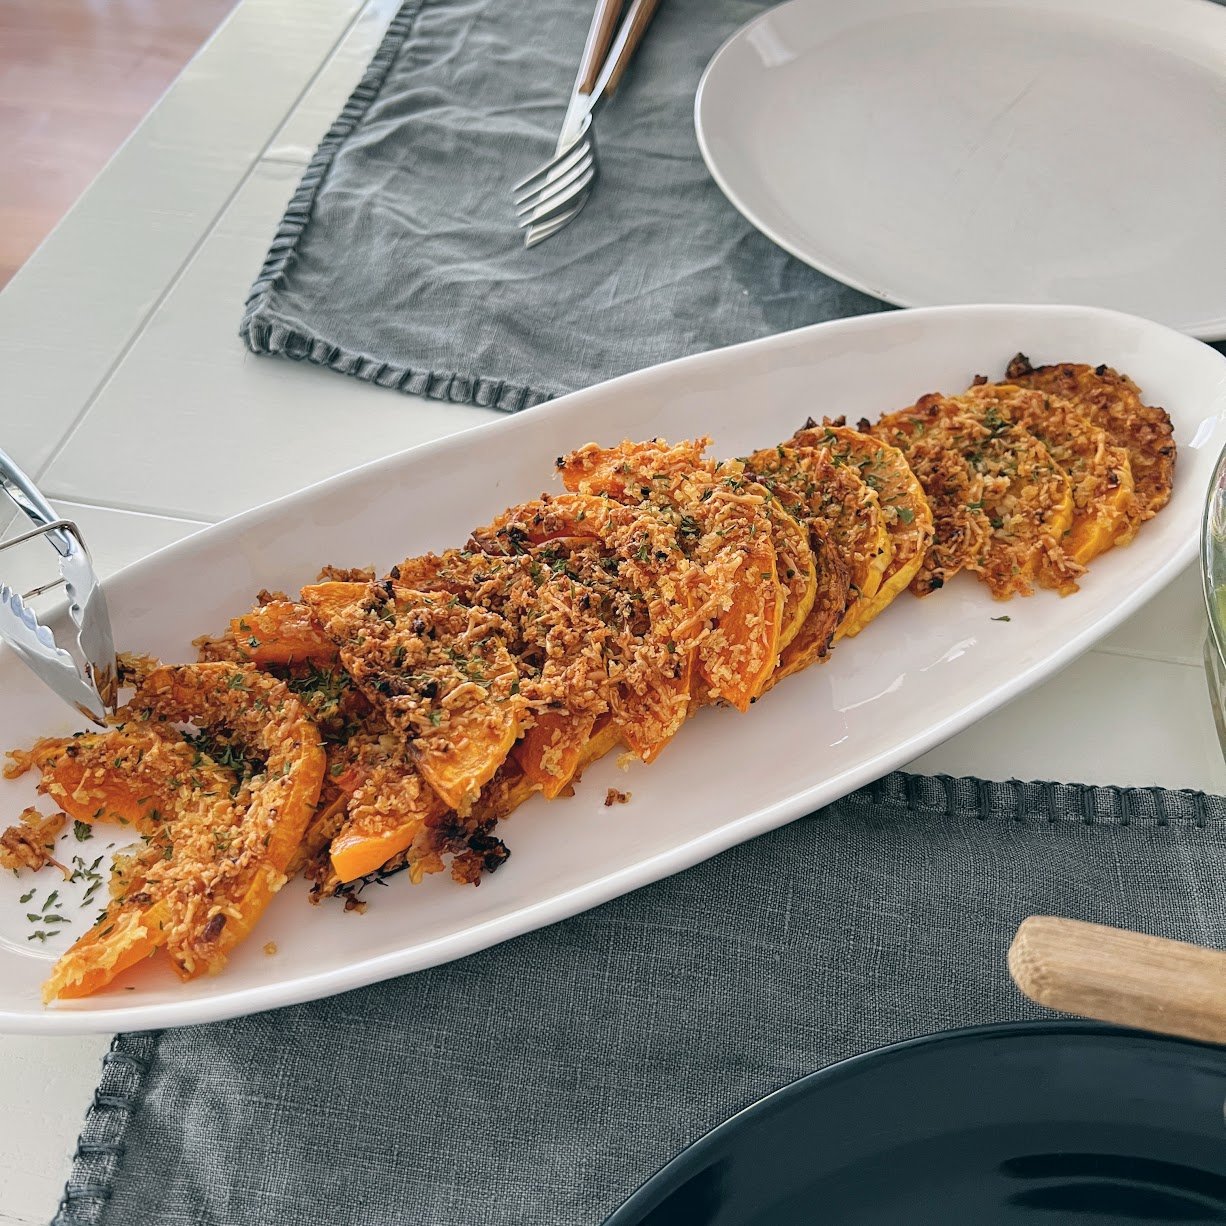
Parmesan Pumpkin Gratin

Be warned, this recipe may ruin how you enjoy pumpkin after tasting it. This is technically a side dish, but every time we have it I’m always wanting to eat more of it.


INGREDIENTS:

  • Butternut Pumpkin, 1 (~1kg)

  • Butter, 1 cup

  • Garlic, 2 cloves, finely chopped

  • Panko Bread Crumbs, 1/4 cup

  • Parmesan cheese, 1/3 cup, grated

  • Fresh Parsley, 1/4 cup, chopped

  • Salt, 1/4 tsp

  • Pepper, 1/8 tsp


METHOD:

  1. Heat oven to 190 degree C (375F). Spray a 30x20 glass baking dish with cooking spray.

  2. Peel, halve lengthwise, and seed the pumpkin. Cut into 1cm thick slices.

  3. Arrange slices overlapping slightly in bottom of baking dish.

  4. In a medium saucepan, melt butter (1 cup) over medium heat.

  5. Reduce heat to low, add Garlic (2 cloves worth); cook for 2-3 minutes, stirring frequently until garlic is soft. (Do not let butter brown).

  6. In a small bowl, mix panko bread crumbs (1/4 cup), parmesan cheese (1/3 cup), and 1 tablespoon of the butter-garlic mixture.

  7. Brush the pumpkin with remaining butter-garlic mixture. Sprinkle on salt (1/4 tsp), pepper (1/8 tsp), and the bread crumb mixture.

  8. Bake uncovered for 30-40 min (or until pumpkin is tender when poked with fork). Increase oven to 220 C (425F) for 5-10 more minutes, or until lightly browned.

  9. Remove from oven, and sprinkle with parsley before serving.

Sue's Awesome Banana Muffins

Quite a lot of the recipes I make and share come from my wife (Sue). When she made these quick, easy, and mostly healthy Banana Muffins the other day I was blown away. Not only were they delicious, but a fun activity to do with Zach.

IMG_8285.jpg

Ingredients:

  • 3 large ripe bananas

  • 3/4 cup white sugar

  • 1 egg

  • 1/3 cup oil vegetable oil is best

  • 1 1/2 cups all purpose flour

  • 1 tsp baking soda (bi carb soda)

  • 1 tsp baking powder

  • 1/2 tsp salt


Optional Ingredients:

  • Chocolate Chips

  • Blueberries

  • Oats (Steel Cut)

METHOD:

  1. Preheat your oven to 180 degrees C and line your muffin tin with 12 paper muffin cups.

  2. In a large mixing bowl, mash the bananas with a fork until no large pieces remain.     

  3. Add the sugar, egg and oil and mix with a wooden spoon until everything is incorporated.

  4. Measure the flour, baking powder, baking soda and salt into a separate mixing bowl and stir them together with a fork. Once they’re mixed together, dump the dry ingredients into the wet ingredients.

  5. Using a wooden spoon, carefully mix the wet and the dry ingredients together. The danger here is over-mixing which will result in dense, flat and dry muffins. The best technique for mixing is to scoop underneath the mixture and pull up gently instead of stirring around in a circle (like you’d stir your coffee, for example). Continue mixing this way just until the dry ingredients have been incorporated. It’s fine if there are a few small streaks of flour in the batter; it’s the large pockets of flour you want to make sure are incorporated.

  6. Spoon the batter into 12 lined muffin cups. Try your best to ensure you fill the cups evenly. This will ensure each of the muffins is finished baking at the same time (you don’t want some over-baked and some raw in the middle!)

  7. OPTIONAL: Add in Chocolate Chips / Blueberries to filled muffin cups, stir in/mix with toothpick.

  8. OPTIONAL: Coat / top muffins with sprinkle of oats.

  9. Bake the muffins in the oven at 180 degrees C (350F) for about 16-18min (it could be 22-25 min depending on your oven, but check around the 18min mark) or until they are golden brown.

  10. Let them cool in the tins for about 5 minutes and then turn them out of the tins to let them cool completely on a cooling rack. Or, enjoy one warm from the oven slathered in butter.


Notes:

You can store the muffins in an air tight container for about 4 days, but just make sure they are fully cooled before you store them.


An all chocolate chip batch

An all chocolate chip batch

Stir-fried Kimchi / Kimchi-bokkeum (김치볶음)

If you are a fan of Kimchi then you must check out and try this super easy recipe. This is a great way to “"glow up” Kimchi into a very tasty side dish and is also a great way to save overripe Kimchi from having to be thrown away.

IMG_7902.png

Note about kimchi ripeness:

This dish works best if the the kimchi is a little overripe. The sugar syrup is used to counteract the ripeness and if you are using fresh kimchi you'll reduce the measurements down to 1 tbsp. If you are using really overripe kimchi, you'll up the measurements to 3 tbsp.


INGREDIENTS:

  • Kimchi, 2 cups (slightly overripe kimchi)

  • Oligo Syrup, 2 tbsp (올리고당)

  • Sesame Oil, 2 tbsps

  • Olive Oil ~3 tbsp

Adjustments.jpeg

METHOD:

  1. Heat up a deep pan with olive oil on high heat

  2. Add Kimchi to pan, flatten to get as much heat as possible

  3. Stir fry on high heat for 5 min, stirring and ensuring as much heat is on kimchi as possible

  4. Add in 2 tbps Oligo syrup and Sesame oil. Note, you can do this using just a normal spoon.

  5. Mix and stir fry for another 3-4 minutes, until well cooked.

Place in a container that won't stain (glass) and use cling wrap to seal top before placing lid to minimise smell in fridge.

Tip: flatten the Kimchi down to maximise cooking area.

Tip: flatten the Kimchi down to maximise cooking area.

Note that I'm just using a normal spoon. No need to be super specific. This is more about having a 1:1 ratio for Oligo to Sesame oil.

Note that I'm just using a normal spoon. No need to be super specific. This is more about having a 1:1 ratio for Oligo to Sesame oil.

Near the end, you'll note the cabbage is shrinking a bit, it's getting some char, and the smell is amazing.

Near the end, you'll note the cabbage is shrinking a bit, it's getting some char, and the smell is amazing.

Korean Beef Soybean Stew / Doenjang jjigae (된장찌개).

One of our favourite Korean soups is this hearty beef soybean stew. I have a personal mission to not only expand and improve my cooking in general - but also focus on Korean dishes. This was my very first attempt at making this - and I was really happy with how it turned out.

IMG_7505.png

This soup is actually quite simple to make - though some of the ingredients might require a special trip to the Korean grocer to obtain.


INGREDIENTS:

  • 200g, Korean Radish (cut into thin, bite size piece - see photos)

  • 1 Zucchini, cut into thin quarters

  • 1 onion, chopped

  • 3 stalks spring onion

  • 300-400g beef (try for higher quality stew meat or other well-marbled cut) 

  • 450g pack of soft-medium tofu  (you may wish to increase this as the tofu was really good!)

  • 6 tbsp Korean soybean paste (doenjang)

  • 3 tbsp Korean chili pepper paste (gochujang) - Note: you may wish to reduce this to 2 or 1 tbsp if you were wanting to make it milder.

  • 6 cloves of minced garlic  (minced/chopped finely)

  • 1.2 L of Korean Anchovy Stock (comes in teabags, I used 2 of them). Alternatively you may be able to use water used to wash rice

  • Black pepper to taste


    Optional ingredients:

  • 1 chili pepper (green and/or red). The recipe actually called for this to be added, but gochujang provides a good base level of spice to the soup - I would only add the extra chilli if you were keen on a quite spicy soup.

  • I’ve been told that you can add mushrooms and potatoes to this dish. I think I’ll try the mushrooms next time.

  • There is also a variant that uses thinly sliced shabu shabu style beef - which I would like to try another time.

Adjustments.jpeg

METHOD:

  1. Cut up all the veggies, and ingredients that require chopping. The photo below will help you visualise the way I cut them into “"bite-sized” pieces.

Adjustments.jpeg

2. Preheat a large pot. Brown the meat (just sealing until it’s no longer pink).

3. Add the radish and continue to cook for a few minutes (the aim is to cook the radish a little).

Adjustments.jpeg

4. Add the liquid base (stock/rice water), soybean paste, and chili pepper paste. Stir well to dissolve the pastes. Boil over medium high heat for 4 to 5 minutes.

5. Add the tofu, onion, zucchini and garlic. Boil for an additional 5 to 6 minutes.

6. Just before serving, add in spring onion and cook for another minute or two.

Adjustments.jpeg

7. Serve in bowl with some rice.

Adjustments.jpeg